Eight-EMA ribbon
Eight EMAs, in shades of blue while EMA 8 is below EMA 2 and grey otherwise. EMA 1 and EMA 3 to 7 are visual only, and the purple Extra EMA is a reference line that feeds no signal.
 NinjaTrader 8 indicator, NinjaScript
An eight-EMA ribbon, a BUY or SELL when EMA 2 crosses EMA 8 on a closed bar, and an entry, an ATR stop, up to four targets and two shaded zones drawn at once. A screener reads nine instruments by the same rule, and a trend panel reads five timeframes of your chart's instrument. The zones in the name are the shaded target and risk areas of the current trade, not supply and demand areas found from price structure.
$77one payment, lifetime licence
Get the lifetime licence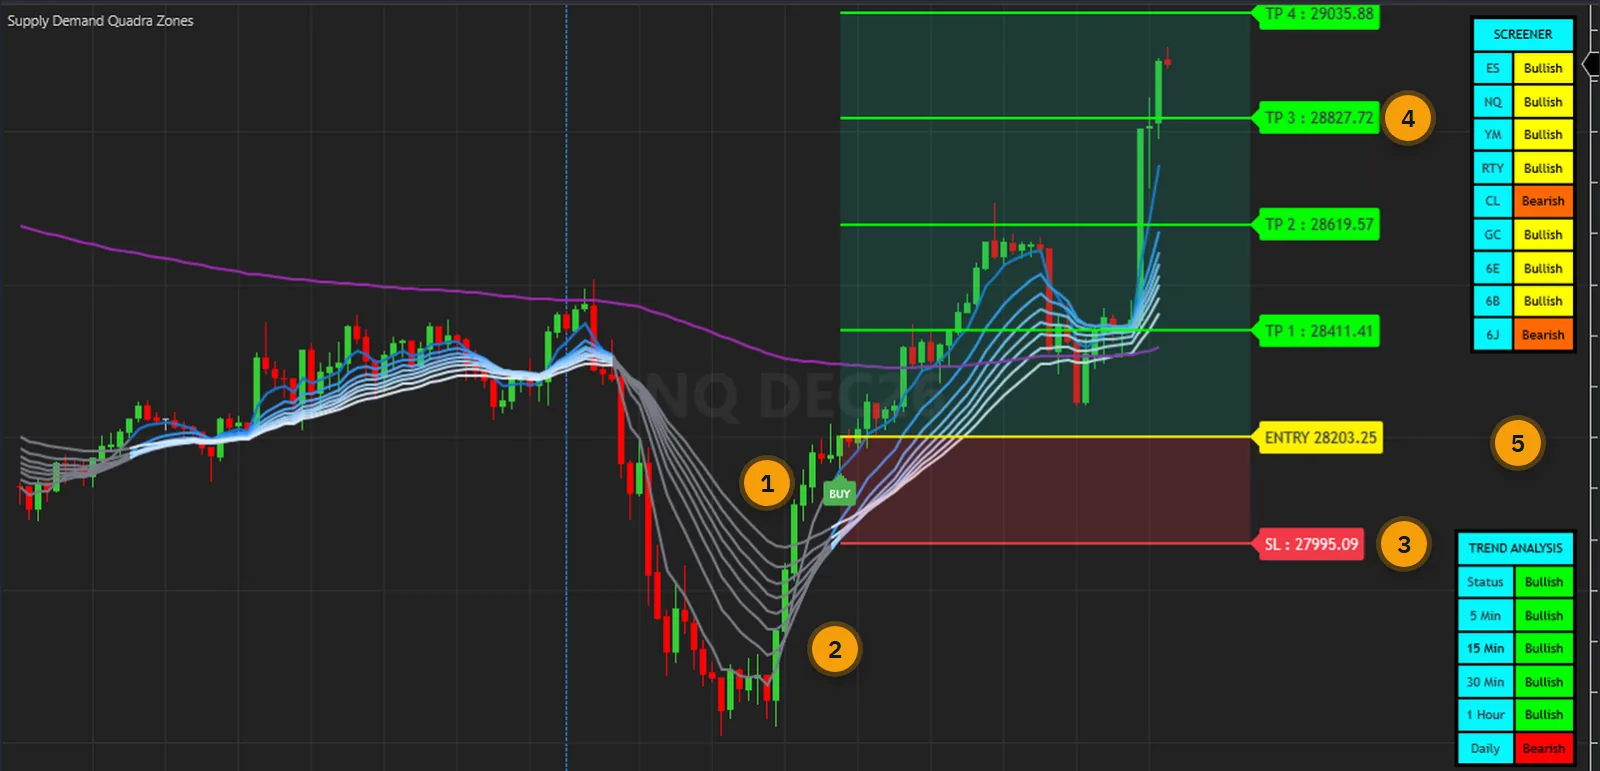
A moving-average cross is one of the simplest signals there is, and the cross itself is the easy part. The moment it prints you still have to decide where the stop goes, where the targets go, whether the bigger timeframes agree and what the rest of the market is doing.
On a chart with two EMAs, none of that is on the screen. You reach for a drawing tool, an ATR reading and a second and third chart, on every cross.
Supply Demand Quadra Zones does not make the cross any smarter. There is no filter, no score and no confirmation, so it whipsaws when a crossover whipsaws. What it adds is the plan and the context: a stop and targets from the ATR, drawn at the signal, with the screener and the trend panel on the same chart. One trade is on the chart at a time, and the next signal replaces it.
The user guide is public: every parameter and the verification are in it. Read it before you pay.
One indicator in the price panel: the ribbon, the signal, the plan and both panels together.
Eight EMAs, in shades of blue while EMA 8 is below EMA 2 and grey otherwise. EMA 1 and EMA 3 to 7 are visual only, and the purple Extra EMA is a reference line that feeds no signal.
A BUY prints on a closed bar where EMA 2 is above EMA 8 and was at or below it on the bar before. A SELL is the same with the two swapped. You set both lengths; 11 and 34 are the defaults.
The entry is the signal bar's close, and the stop sits 2 ATRs away by default, on a 14-bar ATR. ATR Multiplier for SL changes the stop distance, and through it every target.
Target n sits at the stop distance times TP Multiplier times n, so the defaults give 1R, 2R, 3R and 4R, where R is the stop distance. You can have one to four.
A green zone from the entry to the fourth target and a red zone from the entry to the stop. They are the target and risk areas of the current trade, not areas found in price structure.
ES, NQ, YM, RTY, CL, GC, 6E, 6B and 6J by default, on the chart's own period: Long, Short, Bullish, Bearish or No data. You can type your own instruments. It raises no alert.
Five timeframes of the chart's instrument, 5, 15, 30 and 60 minutes and Daily, and a Status row that reads Bullish when at least two of its three chosen timeframes do.
BUY, SELL and Any, under a master switch. The message carries the entry, the stop and every enabled target. A target or a stop being reached has no alert, and neither has a panel.
The nine EMAs, Signal, TradeDirection, the entry, the stop and four targets are public. Hosting from a strategy or a Market Analyzer column has not been exercised yet, so test it on your own setup.
Every picture below is a NinjaTrader 8 capture with numbered notes added. Nothing on the charts is drawn by hand. Click any image to enlarge it.
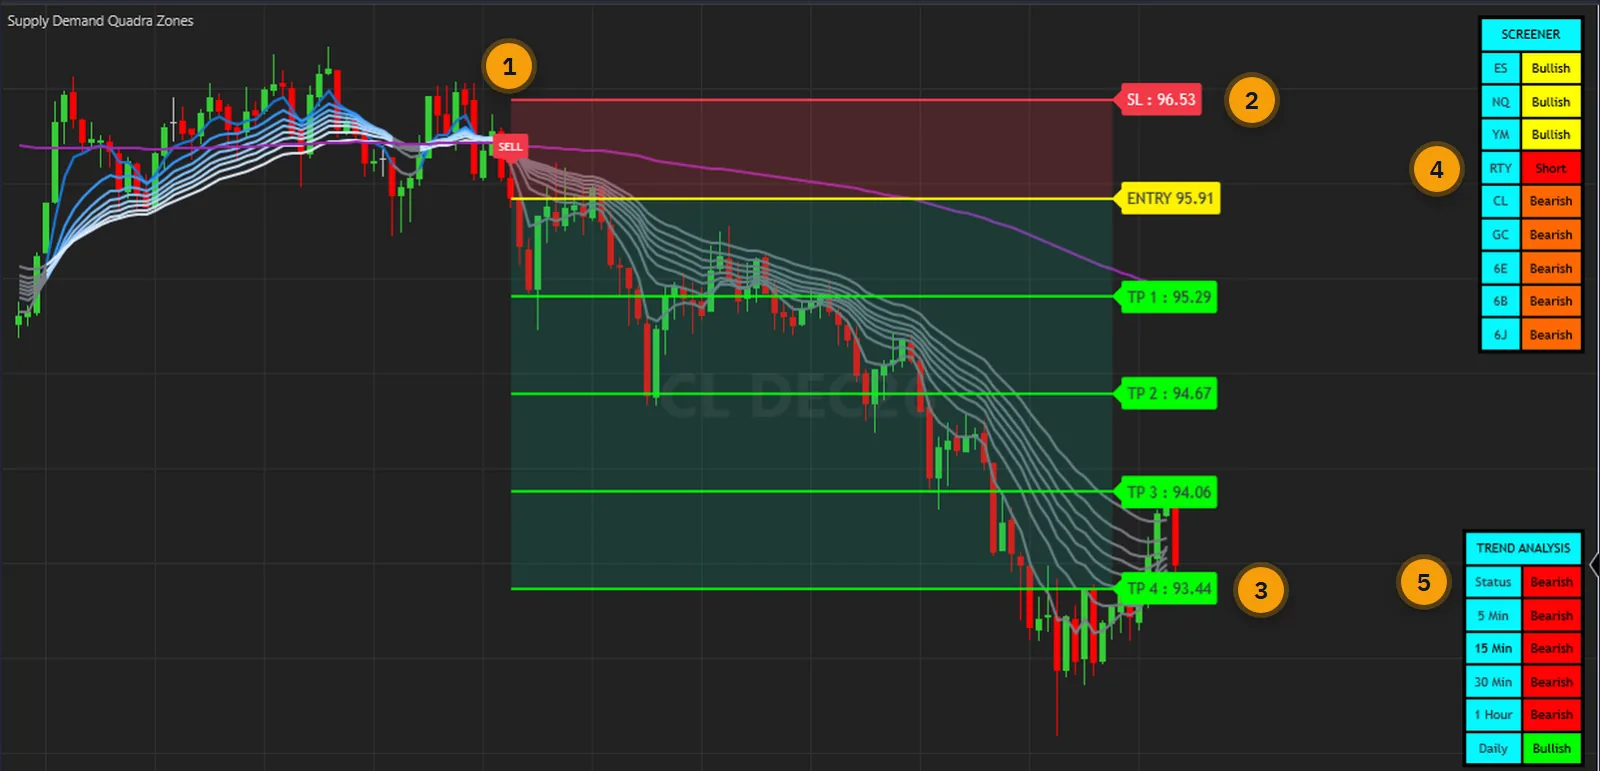
A SELL prints when EMA 8 crosses above EMA 2 on a closed bar. The entry is the close, the stop sits above it and the four targets below it. One trade is on the chart at a time, so the next signal replaces it and every object it drew, whether or not it has ended.
On this chart all four targets were traded through. A trade ends at the stop or when every enabled target has been reached, and its lines stop ten bars after that. Nothing else marks it: no label names the target that was reached, and outcomes are not counted.

The screener classes nine instruments on the chart's own period: Long or Short for the one bar where a fresh crossing happened, otherwise Bullish or Bearish. In this ES 5-minute capture RTY reads Short. Each instrument is an extra data series your connection has to serve.
The trend panel reads 5, 15, 30 and 60 minutes and Daily for the chart's instrument, on bars that have finished. Status is a majority vote of three timeframes you choose, 5, 15 and 30 minutes by default. Both panels change once per chart bar. A daily bar counts as finished at the midnight after its date, so the Daily row can lag the session's end.
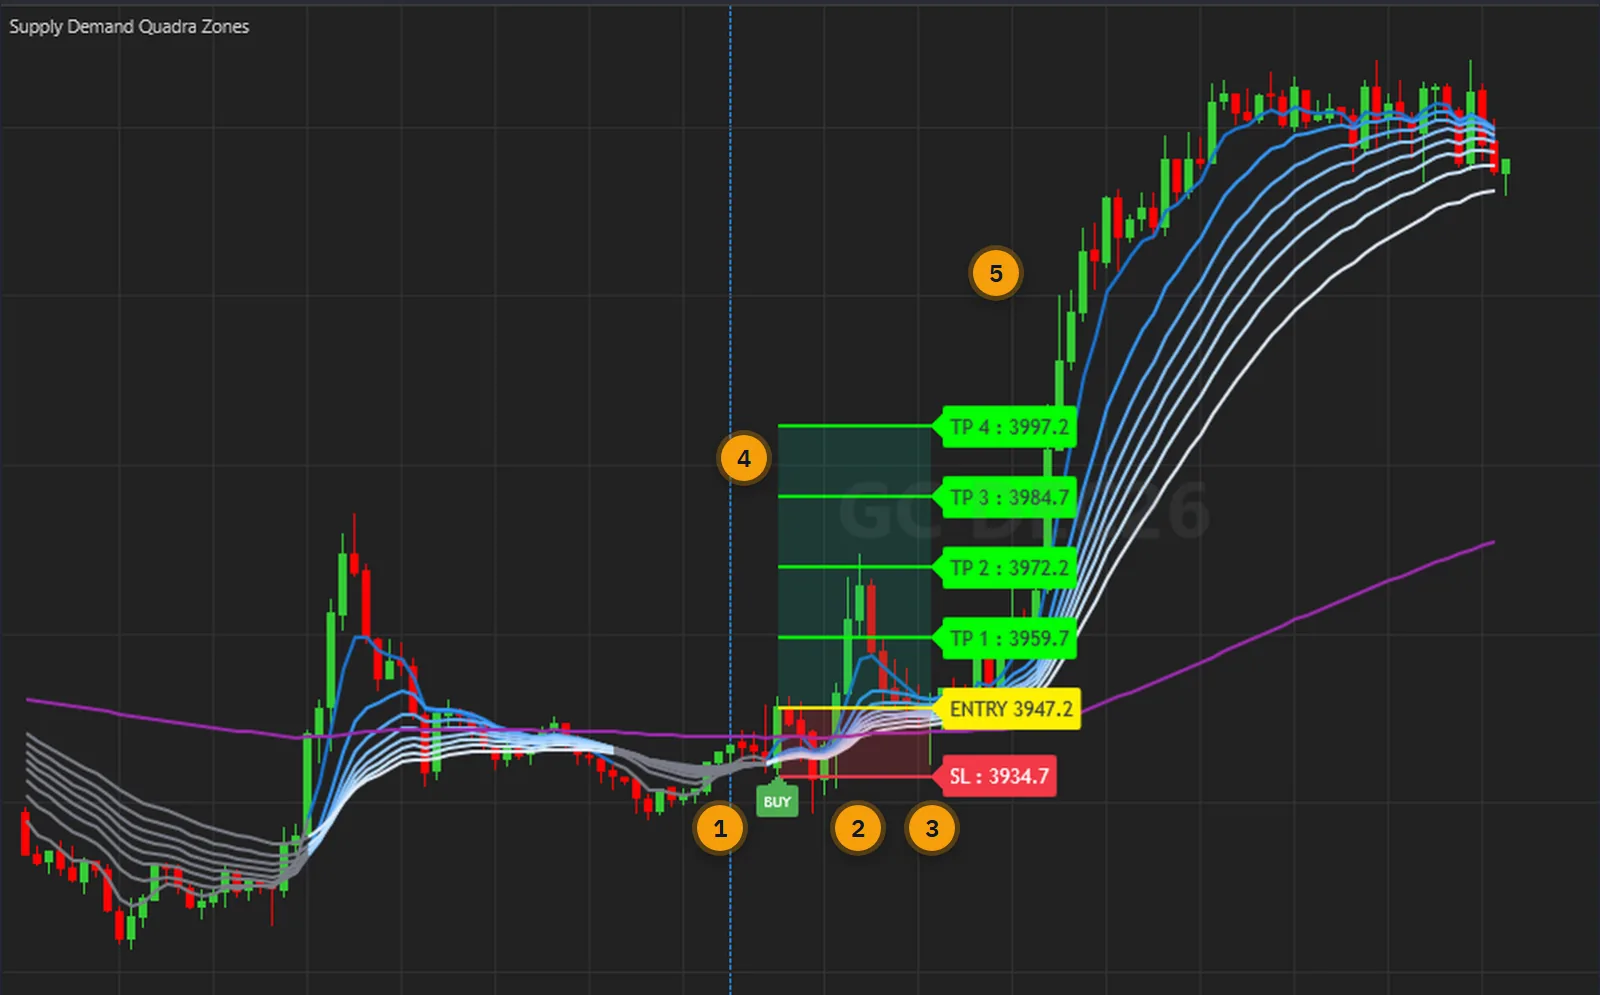
This BUY at 3947.2 had its stop at 3934.7. Three bars after the signal a wick went below the stop, and that ended the trade. The lines and zones ran on for ten bars and stopped there. A chart that only shows the trades that reached their targets would tell you nothing.
The rise that followed went past all four target prices, and it is not part of this trade. That is the plain cost of a stop on a crossover. Nothing here tells you which cross to skip, so position sizing and a risk limit stay with you.
The calculations are not tied to an instrument. The captures below were taken in NinjaTrader 8 on the free simulation feed: index, energy, metal, currency and rate futures, from 1-minute to 30-minute bars, with the indicator at its default settings on every one.
The calculation does not read volume: the EMAs, the ATR, the signals, the levels and both panels come from prices alone, so the volume pane under these charts plays no part. At the defaults the indicator loads 14 more data series, five timeframes of your instrument and nine screener instruments, and a row your connection cannot serve reads No data. That is never a reading, and it does not count as Bearish.
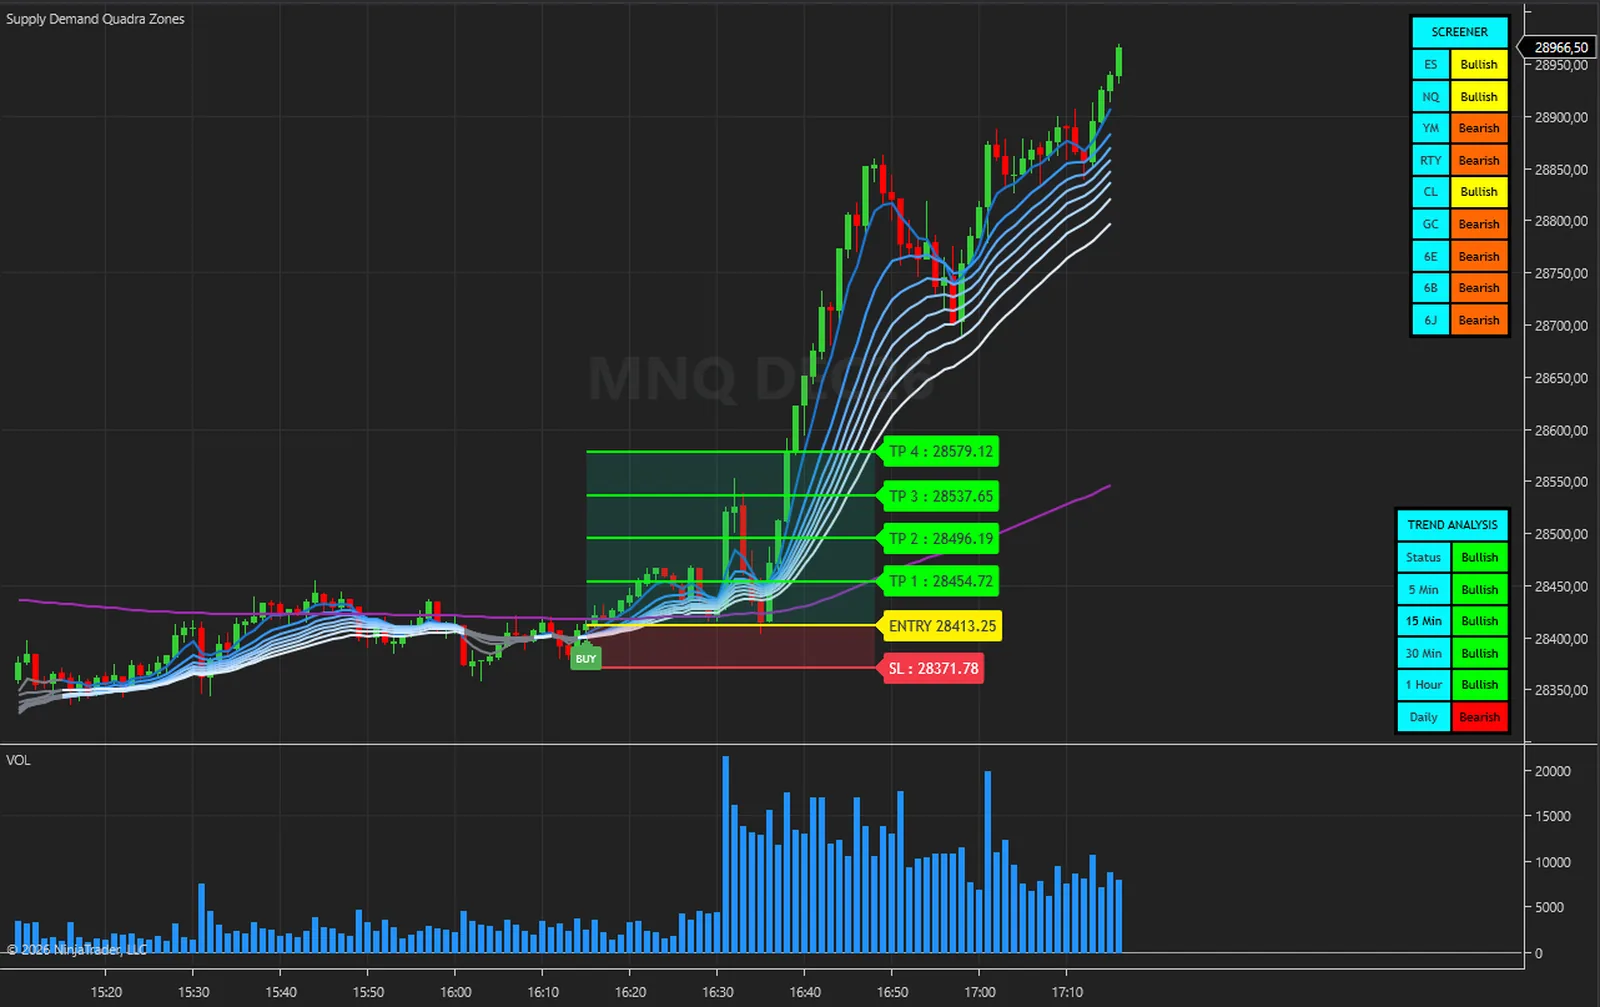
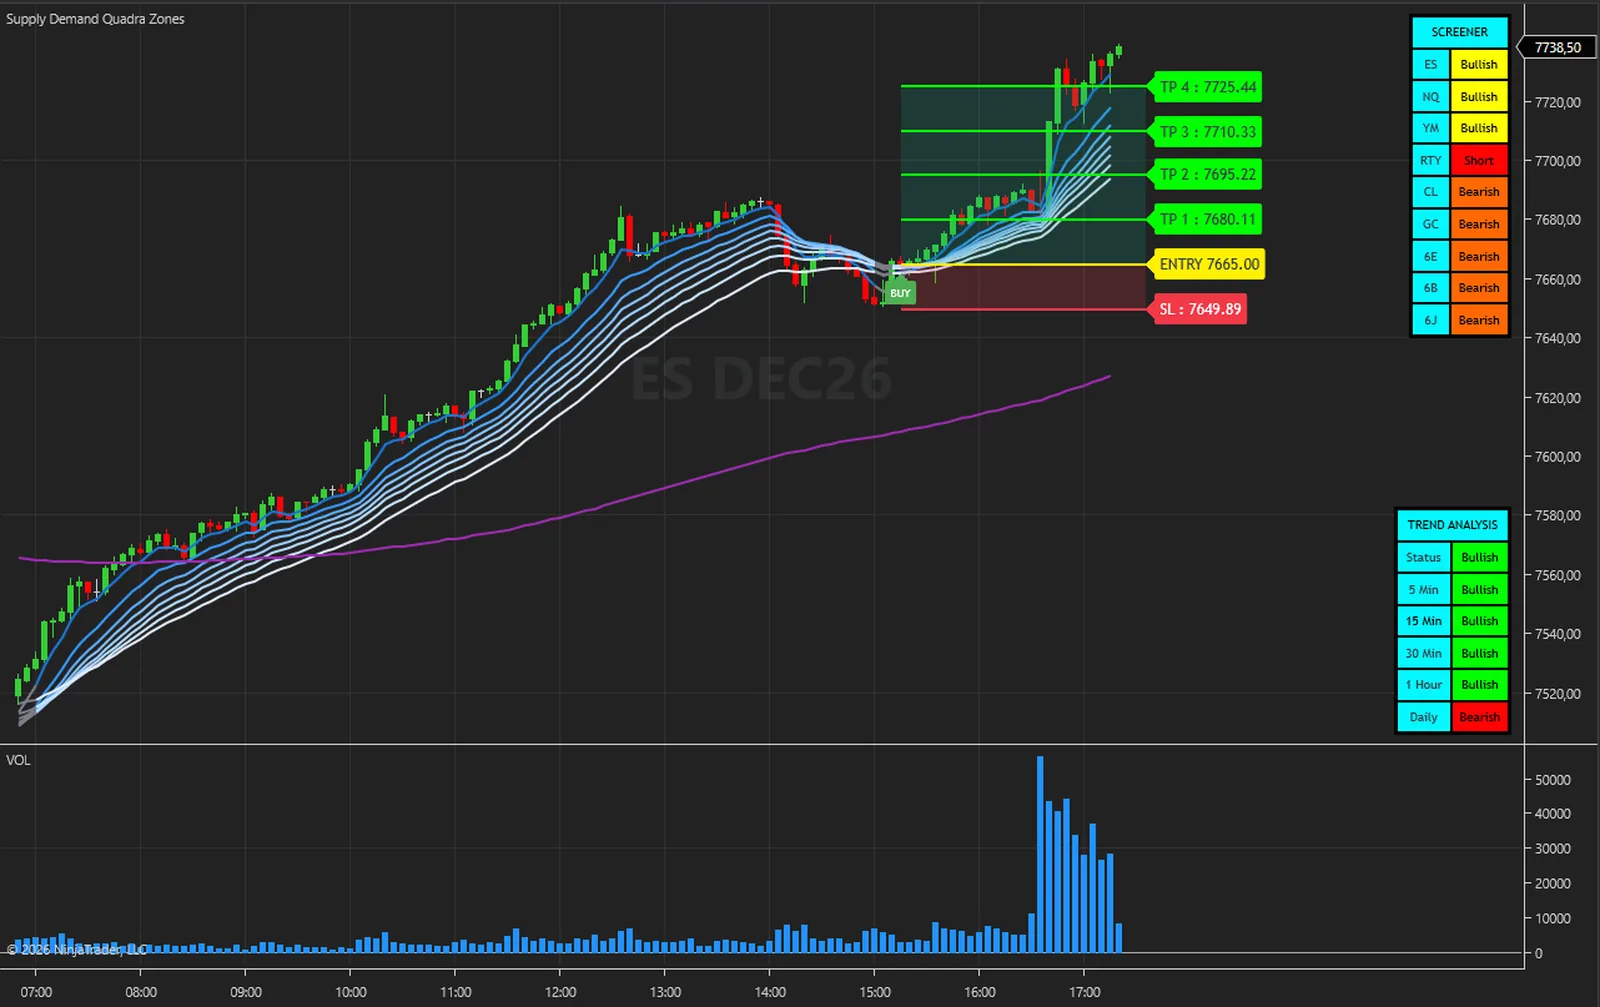
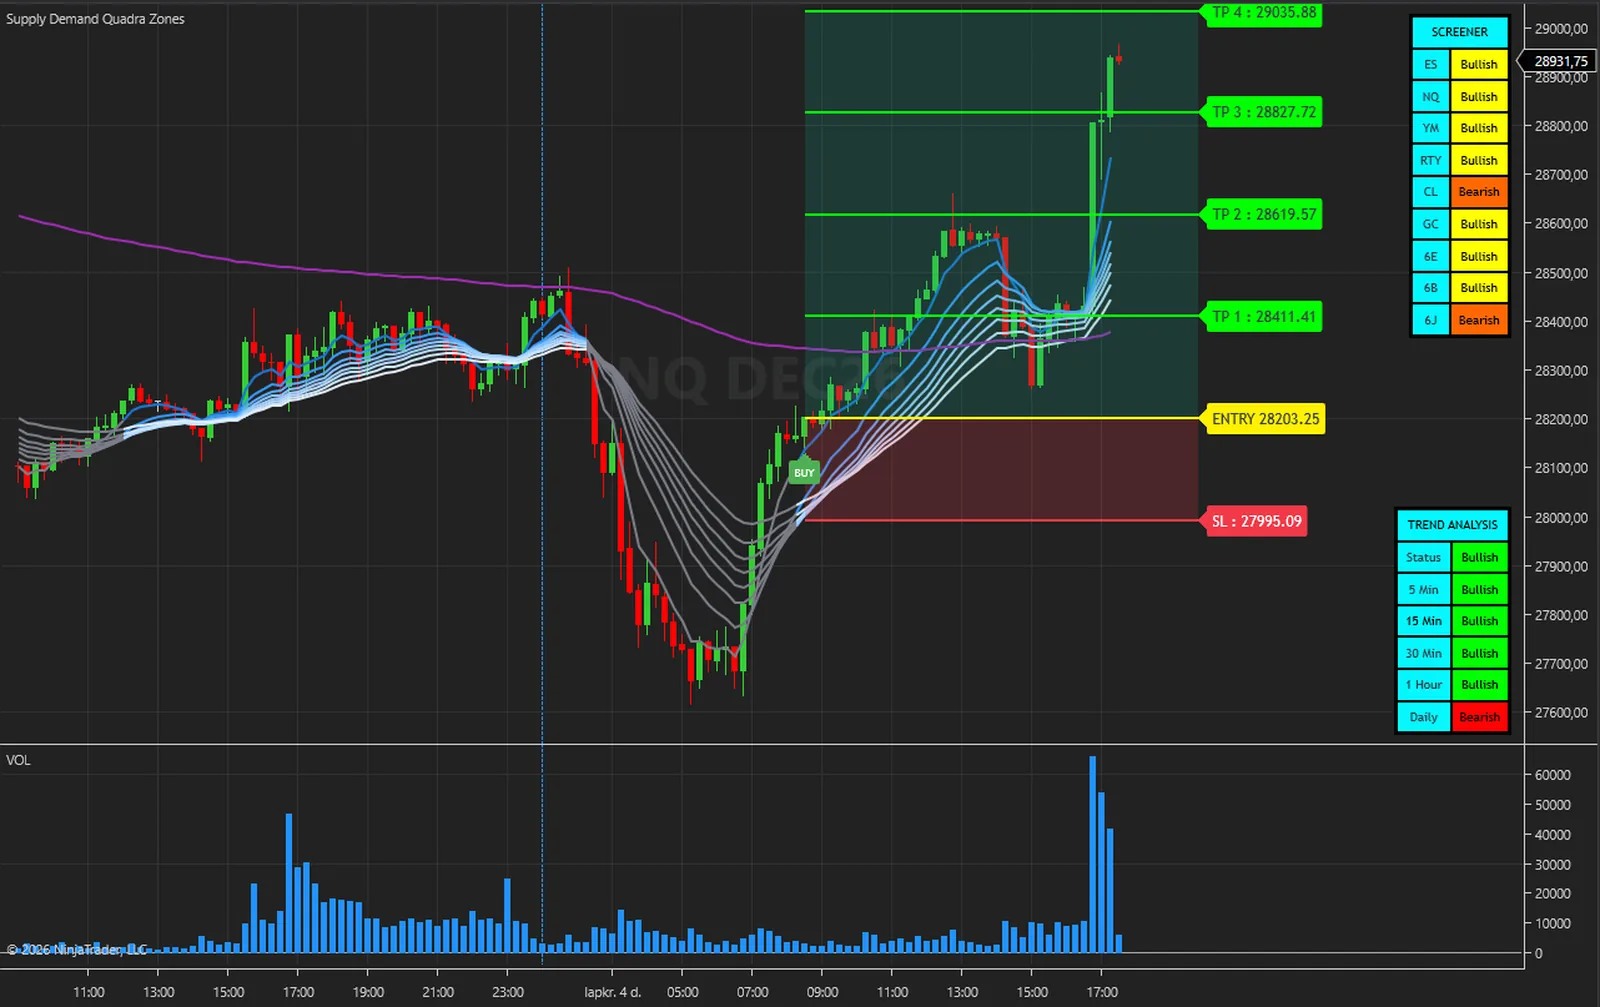
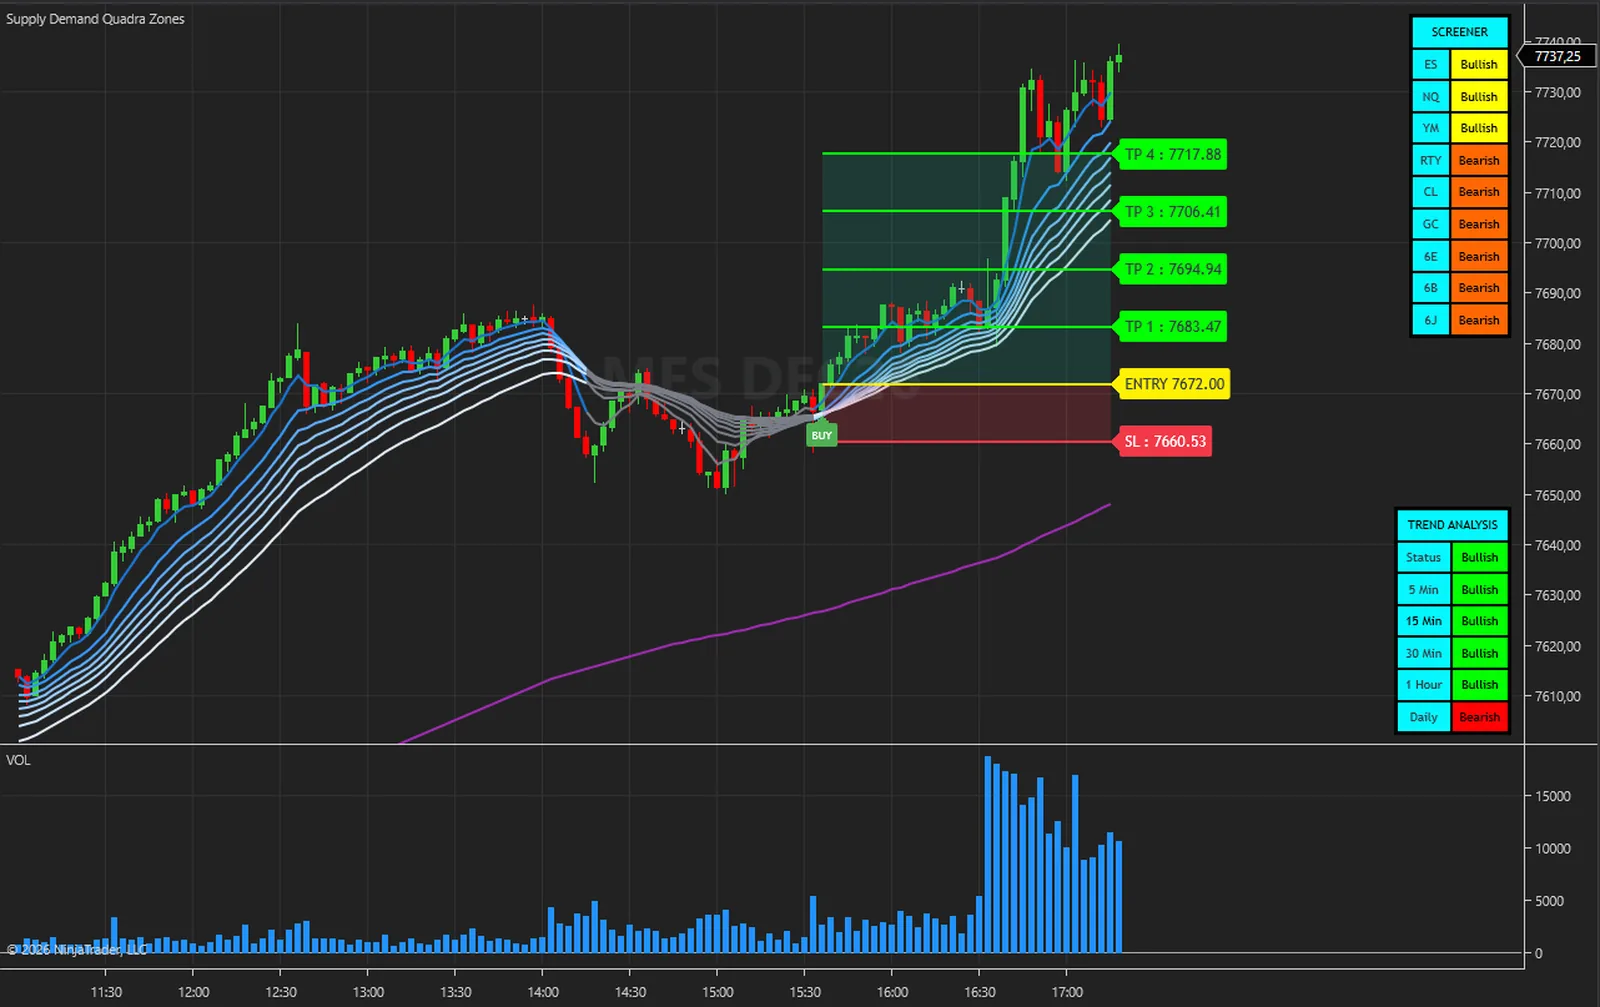
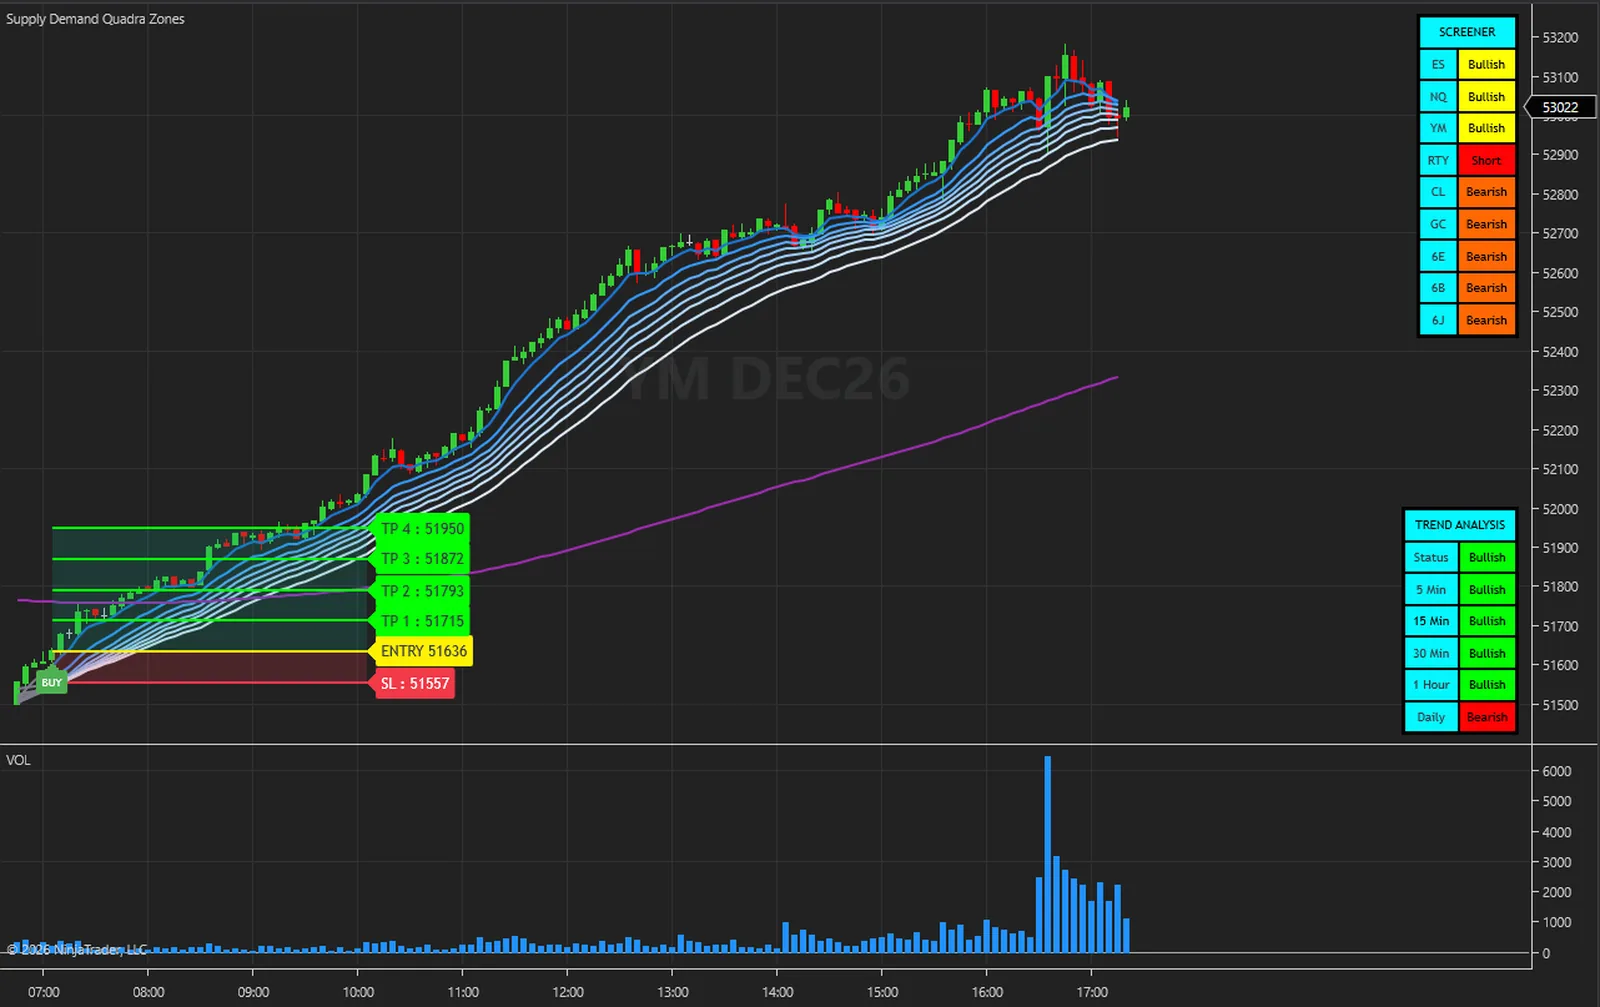
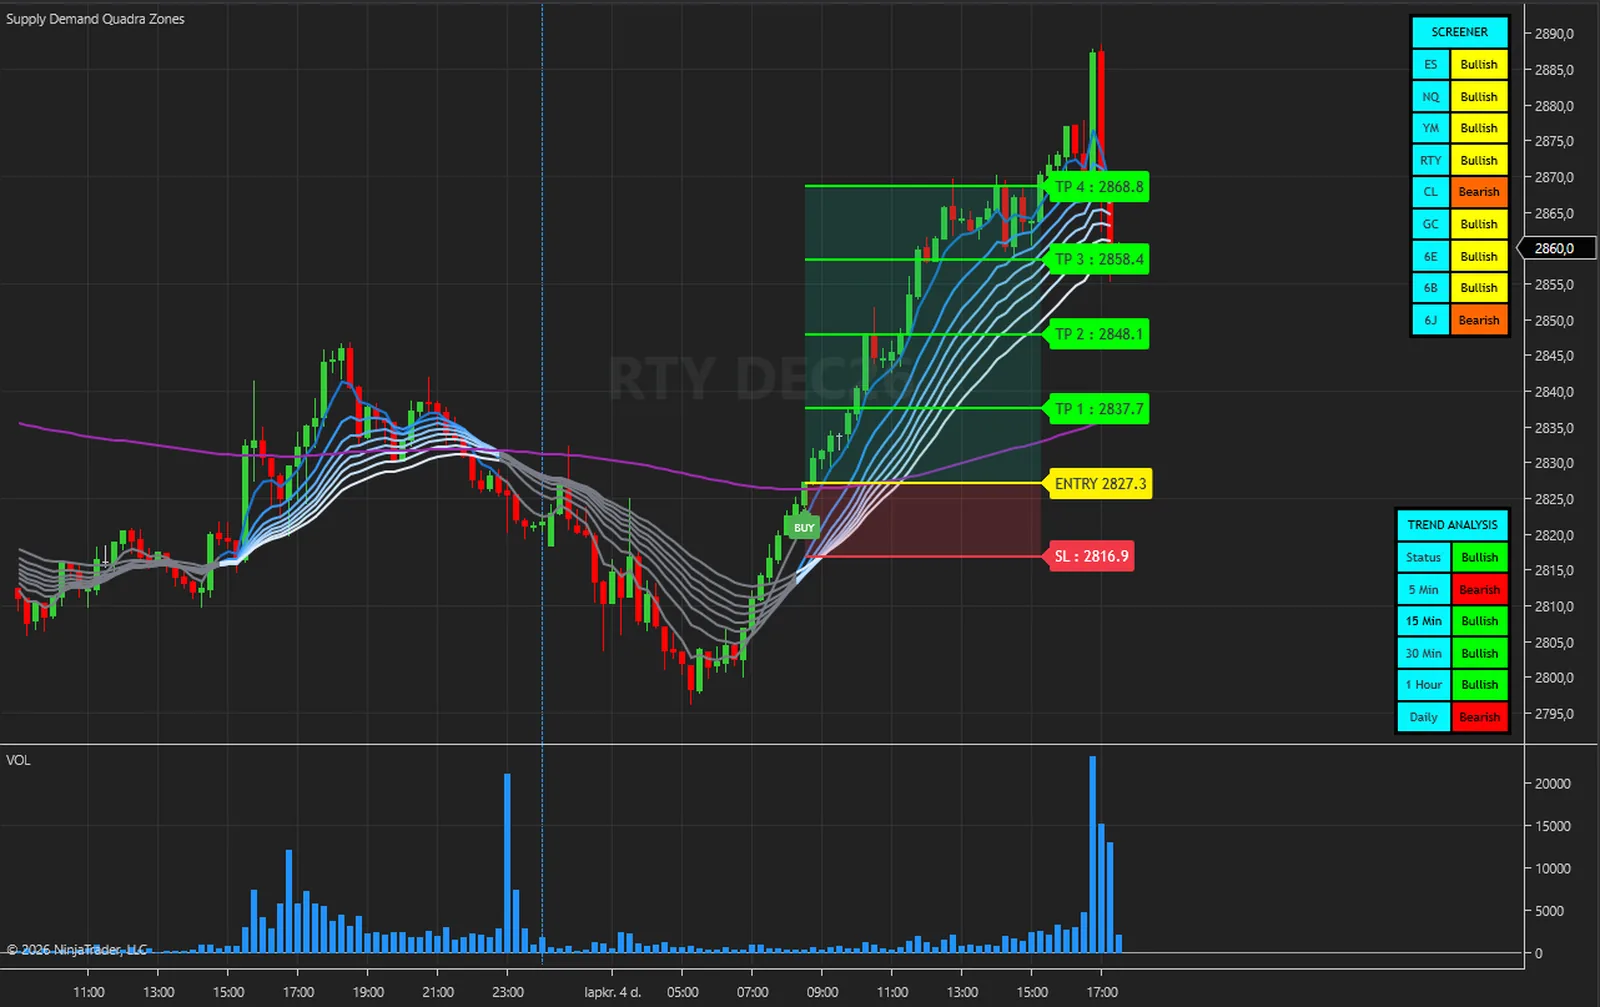
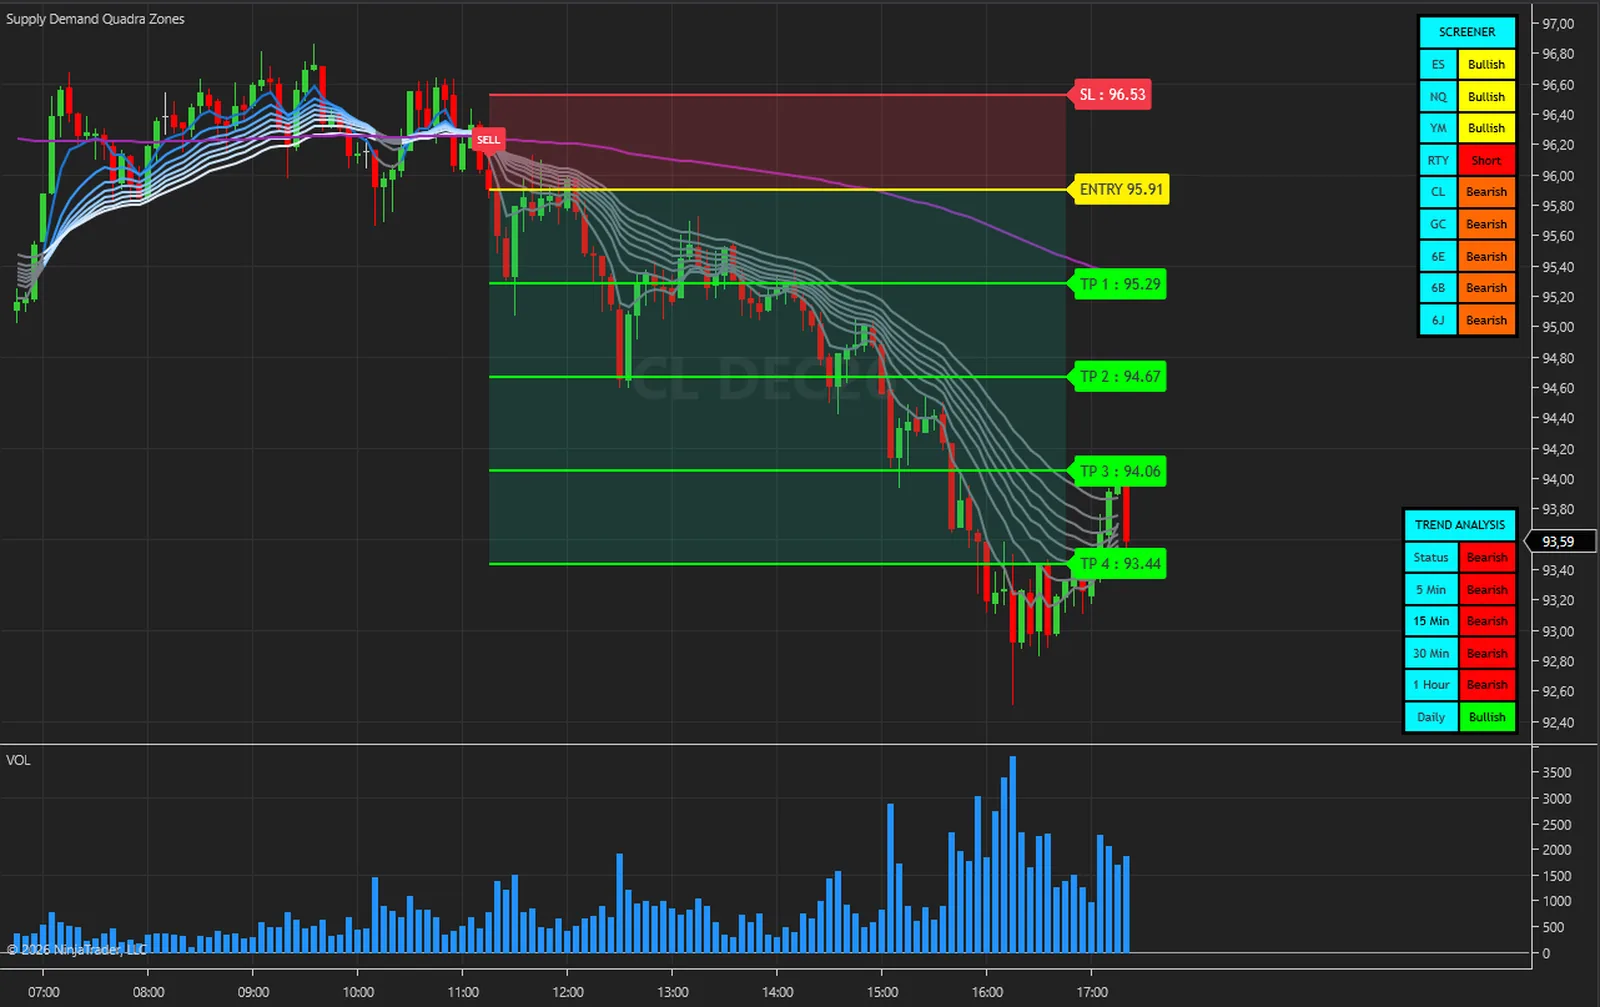
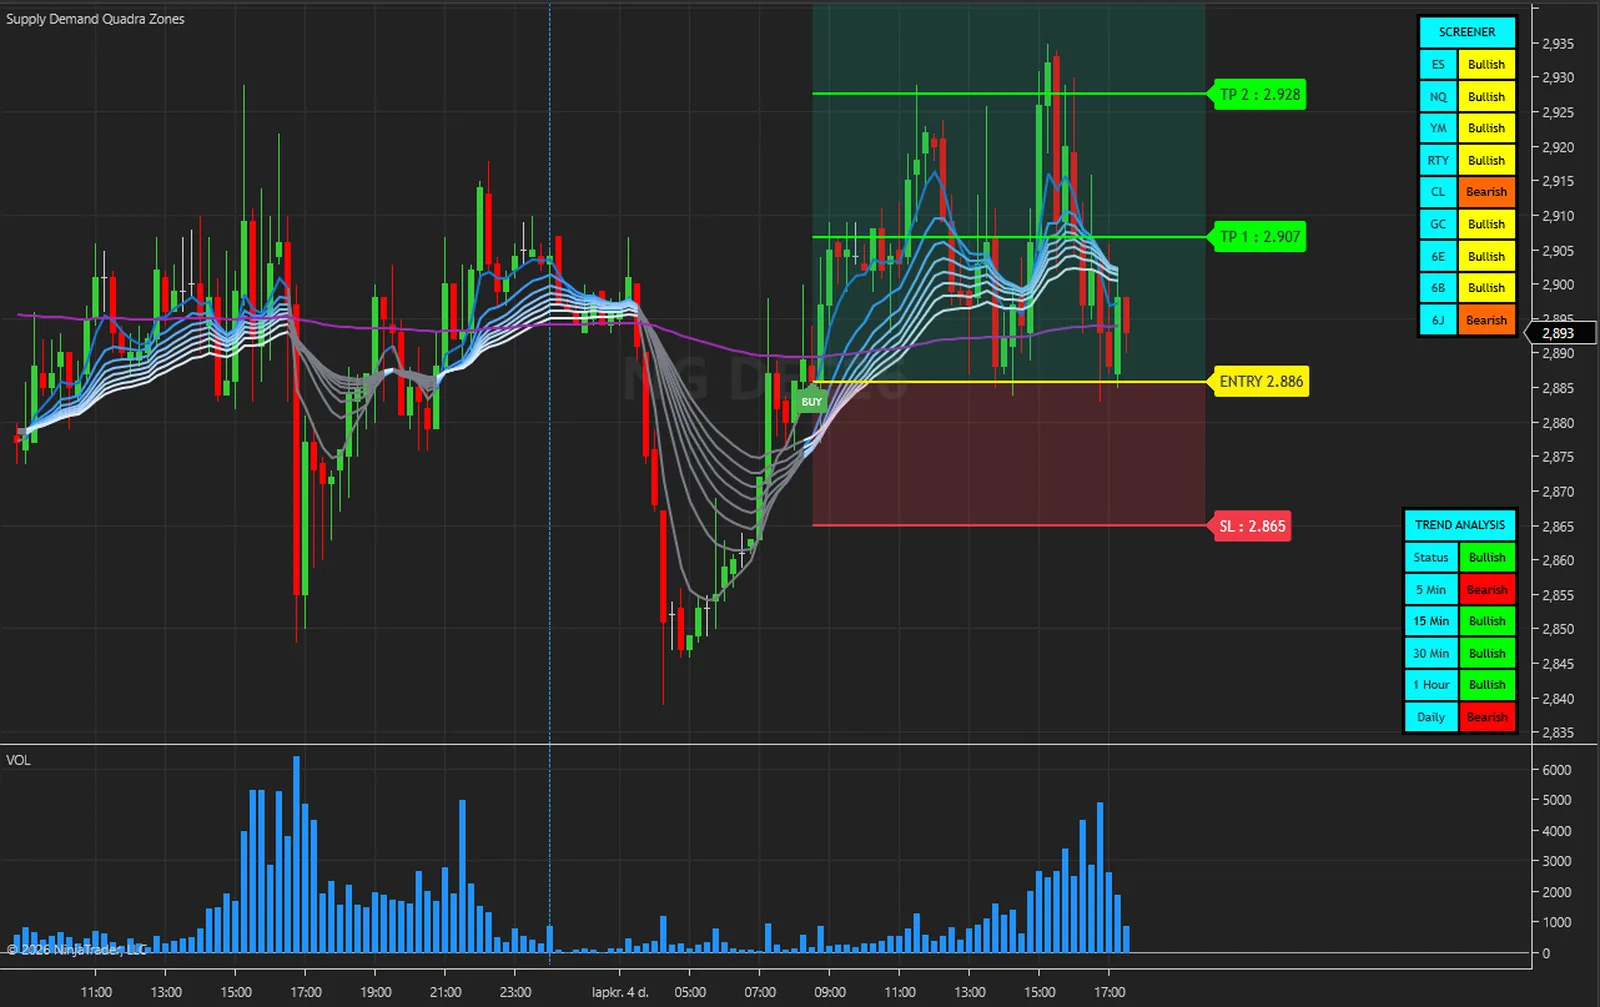
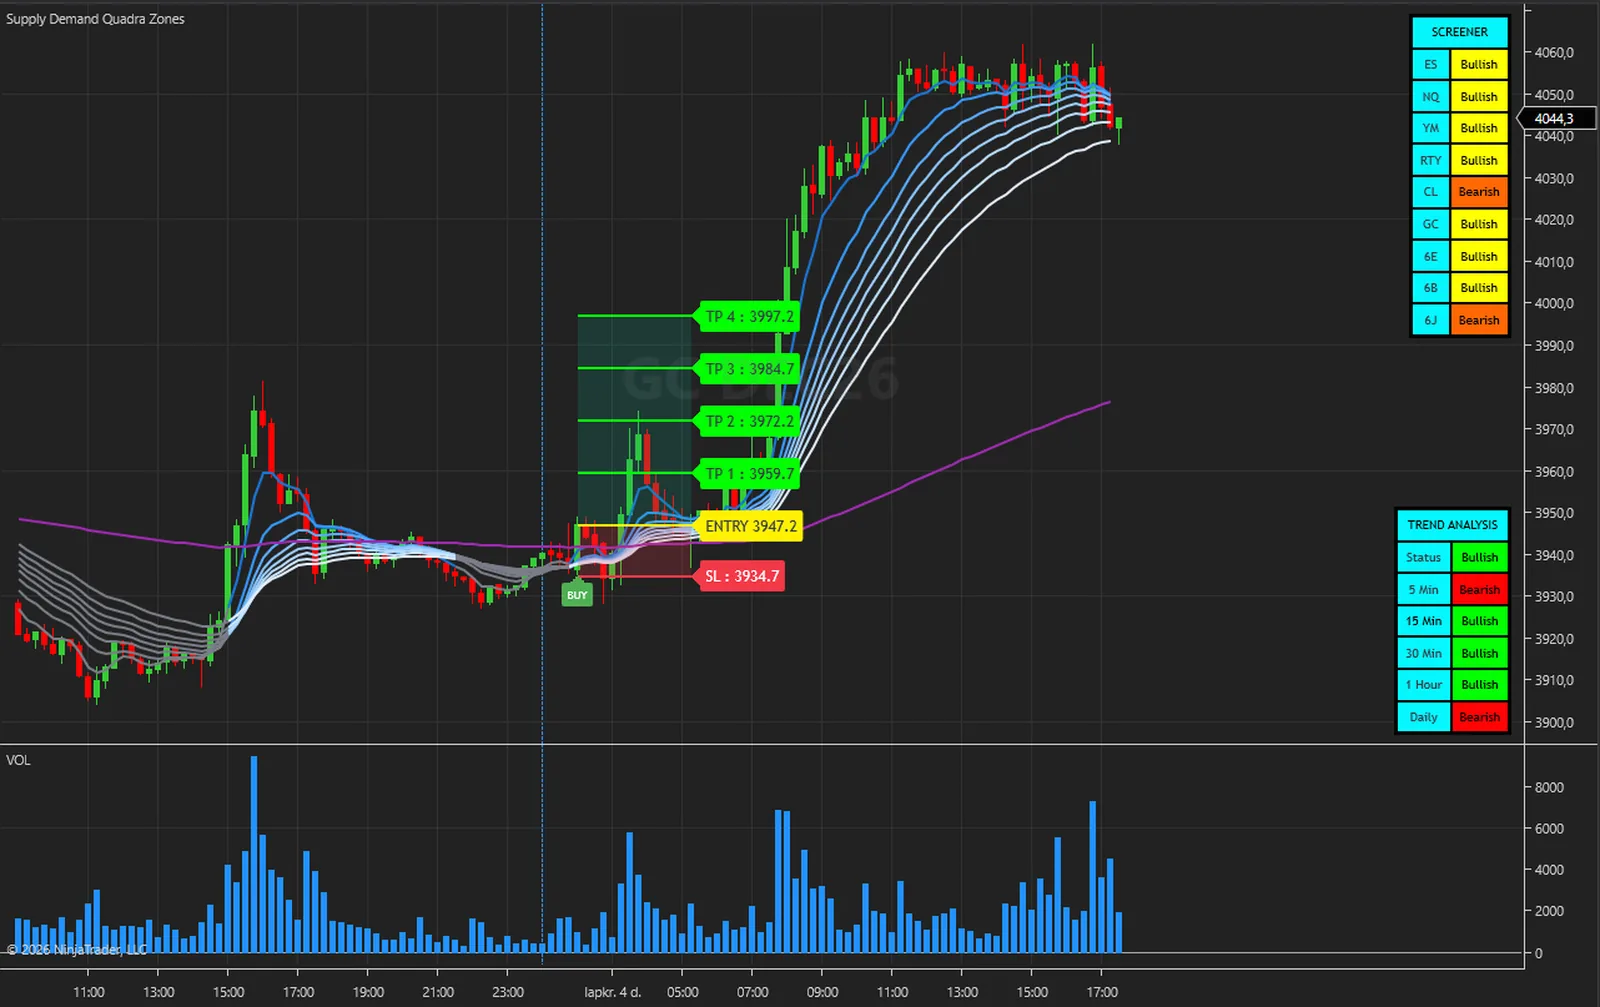
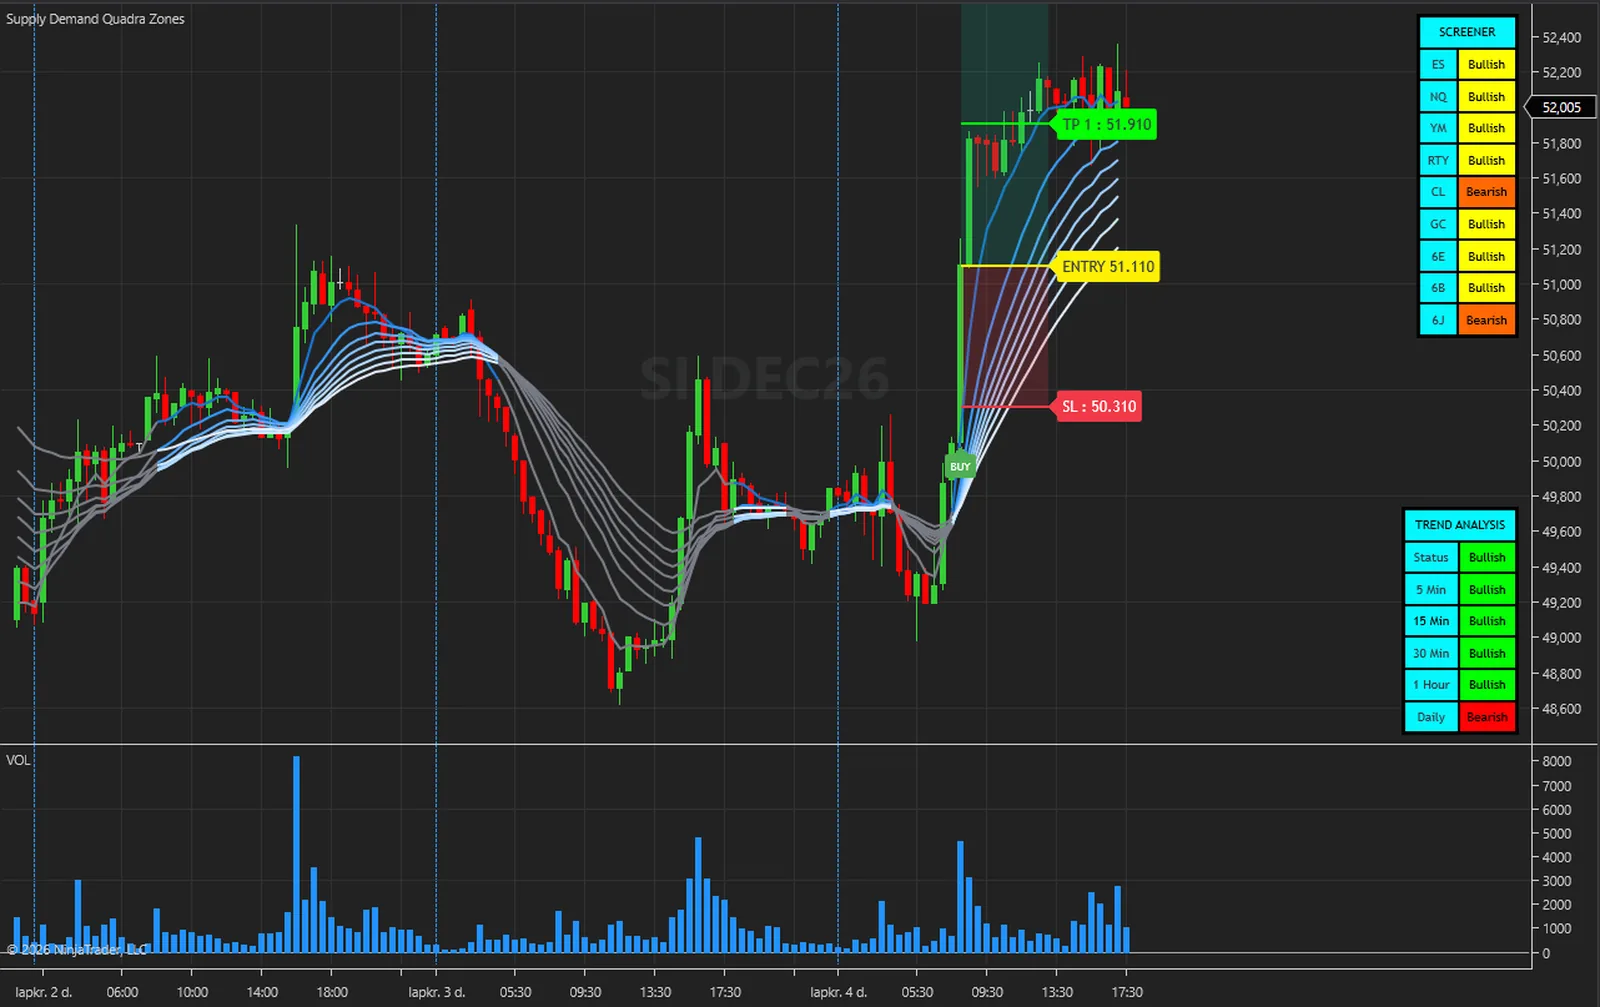
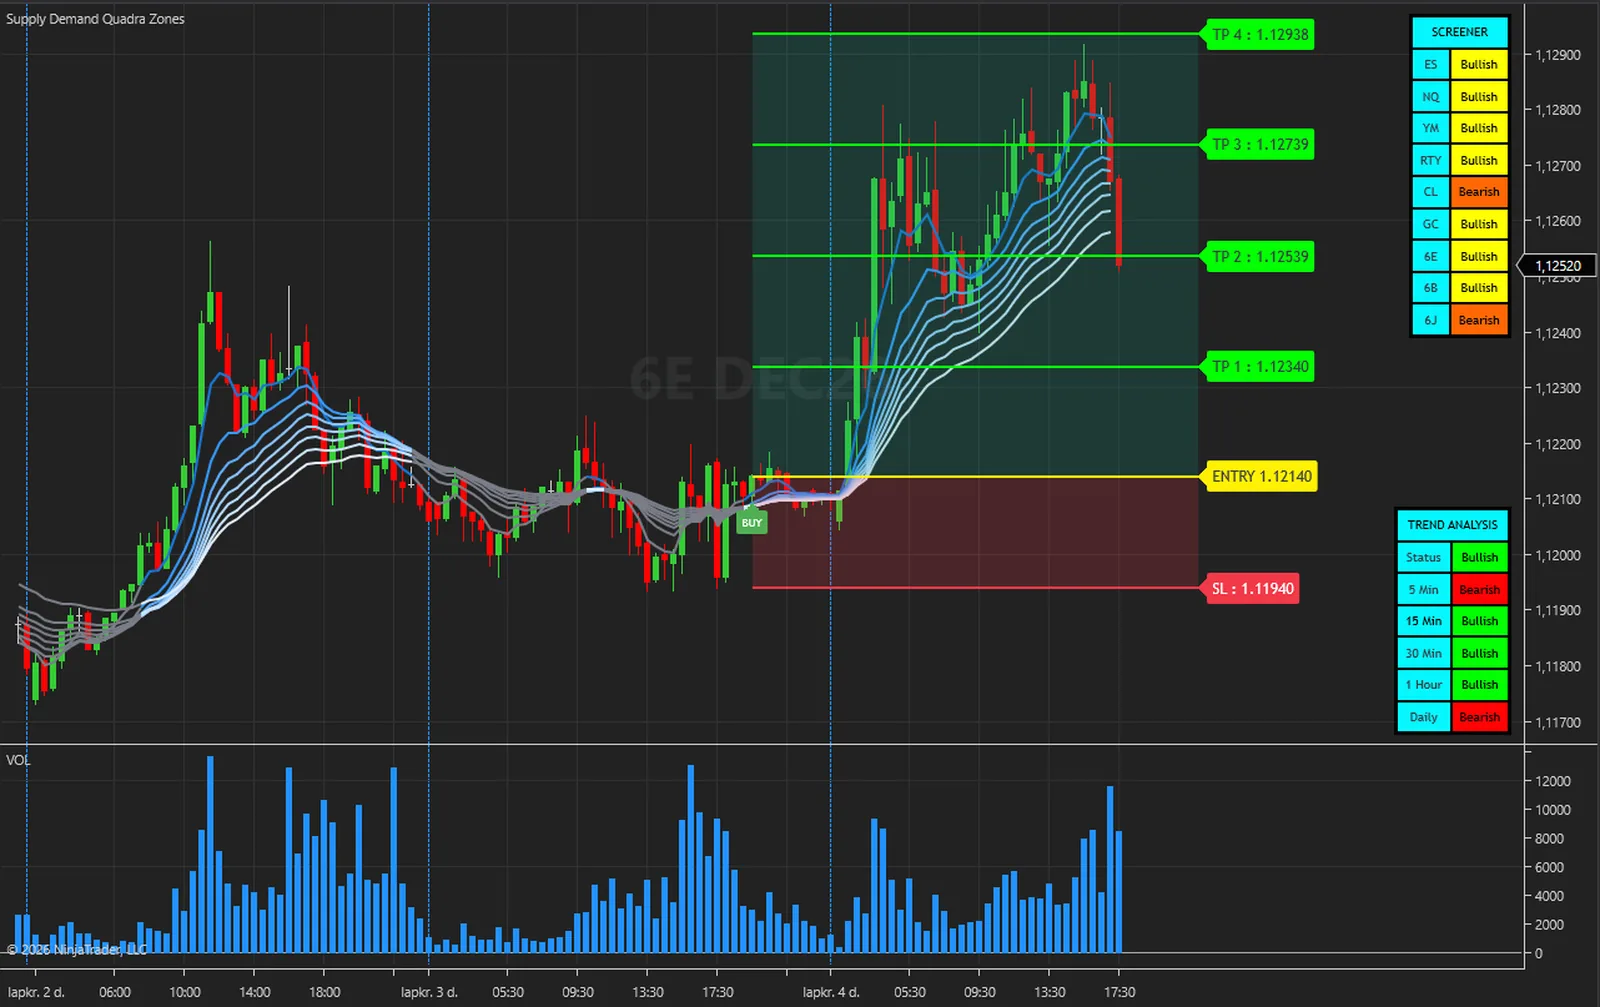
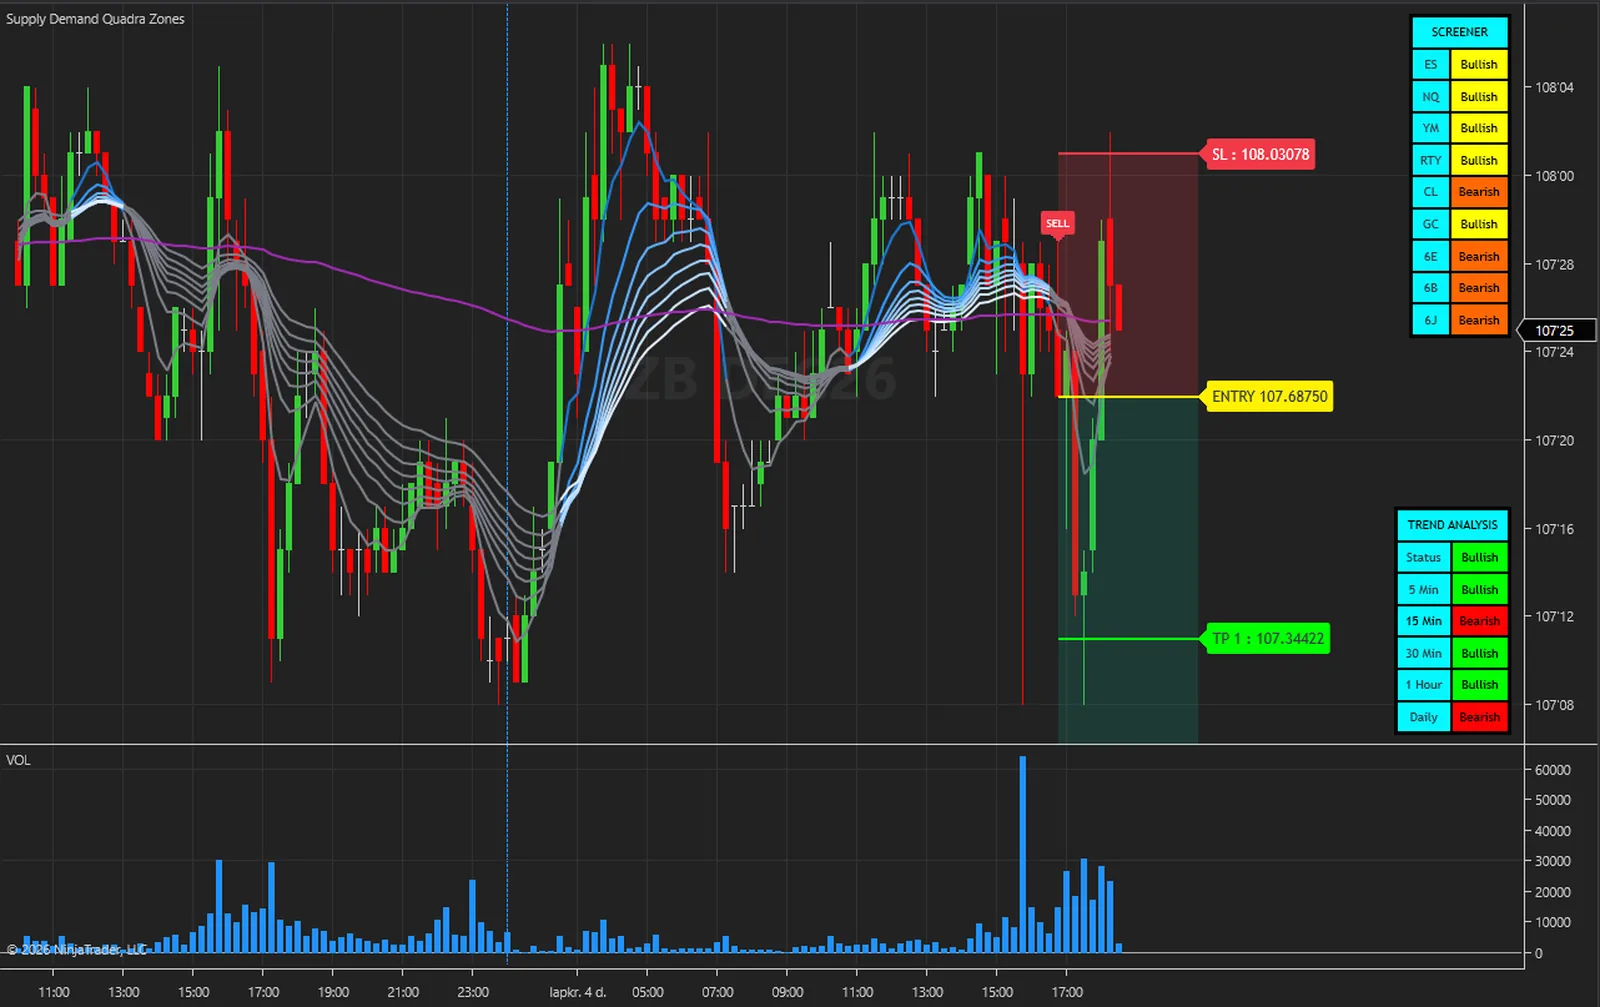
The same steps on every closed bar at the default OnBarClose. Nothing hidden and nothing exotic.
The eight ribbon EMAs and the Extra EMA are written on the closed bar. EMA 8 needs 34 bars before it exists, and the Extra EMA needs 200.
EMA 2 above EMA 8 now, and at or below it on the bar before, is a BUY. The same with the two swapped is a SELL. Nothing else is checked.
The entry at the close, the stop an ATR multiple away, the targets at multiples of the stop distance, then the plate, the lines, the price tags and both zones.
From the signal bar itself, a low reaching the stop of a BUY or a high reaching the stop of a SELL ends it, and so does reaching every enabled target. Its lines stop ten bars later.
A new signal removes the old plate, lines and zones, whether or not that trade had ended. The panels update once per chart bar, and alerts fire in realtime only.
| Plain EMA cross | Supply Demand Quadra Zones | |
|---|---|---|
| Lines | Two EMAs | An eight-EMA ribbon and an Extra EMA |
| Signal | You read the cross | A BUY or SELL plate on the closed bar |
| Filter or score | None | None: the signal is the cross |
| Stop and targets | You work them out | An ATR stop and up to four targets, drawn at the signal |
| Risk and target areas | Nothing | Red and green zones for the current trade |
| Other instruments | One chart at a time | A screener of up to nine |
| Bigger timeframes | One chart at a time | Five timeframes and a Status vote |
The engine that computes everything also runs outside NinjaTrader. With its diagnostic dump switched on, the NinjaTrader edition writes every committed bar with the values it drew; those bars are replayed through the engine outside the platform, and the two files are compared value by value.
On 4,923 MNQ 1-minute bars every one of the 112 series compared was equal on every bar. A second run, with Calculate set to each tick and the chart left live across the switch from history to live bars, gave the same result on 4,213 bars.
What that proves: the indicator receives exactly one closed bar per chart bar with the right open, high, low, close and volume, never double-feeds or skips a bar, and shows the values the engine produced. What it does not claim: it is a test of correct calculation, not of trading results, and it says nothing about future performance.
The full method is in the user guide: User Guide (PDF) and Installation and Quick Start (PDF).
No subscription and no renewal. Pay once and the indicator stays licensed to your NinjaTrader account, updates included.
Supply Demand Quadra ZonesNinjaTrader 8 indicator
$77one payment, lifetime licence
The licence is issued to your NinjaTrader account through NinjaTrader's Vendor Licensing, by hand, normally within a few hours and always within 24 hours of your form arriving. You get an email with the download link when it is done.
Because a licence cannot be handed back once it is on your account, a sale is final once the licence has been issued. If you paid and the licence has not been issued yet, email me and I will refund you in full. The user guide is public, so you can read exactly what the indicator does before you pay.
The full terms of sale and the privacy notice for buyers are one page each, in plain language.
Trading carries risk of loss. This is an analysis tool, not financial advice, and no indicator can promise a profit.
With the default OnBarClose everything is decided on closed bars, and a BUY or SELL on a closed bar does not change once drawn. The next signal replaces it and every object of its trade, because one trade is on the chart at a time. OnEachTick and OnPriceChange also preview the forming bar: a crossing draws its plate, lines and zones while it holds, and they go if it no longer holds a moment later. A preview raises no alert and writes no series. A chart loaded while the market is closed can already show the last bar's plate, as a preview. If you want nothing on the chart until a bar has closed, stay on the default OnBarClose.
No. The zones in the name are the shaded target and risk areas of the current trade: green from the entry to the fourth target, red from the entry to the stop. The indicator does not detect supply and demand areas from price structure, and the signal is an EMA crossover with no filter or score.
EMA 8 needs 34 bars before it exists and the Extra EMA needs 200. The trade on screen comes from the bars before it, and the chart's bars come from Days to load in the Data Series dialog. The panels have their own fixed counts and do not follow Days to load: 2,000 bars of 5-minute data down to 500 daily bars, and 1,000 bars for each screener instrument. Your connection can deliver fewer, and a row reads No data until enough bars have closed to start EMA 8.
Not always. The tag prints the instrument's decimals, but the stop and targets come from an ATR multiple and are not rounded to the tick, so on the NQ chart above the stop reads 27995.09 on a market that moves in quarters. Round them to the tick yourself before you place an order.
The stop and targets are tested from the signal bar itself, so a signal bar wider than the stop distance can end its own trade at once, and its lines stop ten bars later. The SI 30-minute chart in the gallery shows one: the bar's low is below the stop printed for it. Price later traded through TP 1 on that chart, and that is not part of the trade.
NinjaTrader 8.1 Desktop for Windows; the build is tested on 8.1.9.0. Any data connection that delivers bars works, including the free simulation connection.
No. NinjaTrader 8 is free to download and use for charting and simulation, with free real-time futures data for the simulator. A live account with a broker of your choice is a separate step that this indicator does not need. NinjaTrader is the platform it runs inside, not a broker.
No. The licence is tied to your NinjaTrader account login through NinjaTrader's Vendor Licensing, not to a PC. Log in on any installation and the indicator runs; a new PC needs no transfer.
I issue it by hand in the NinjaTrader Vendor Dashboard. It is normally done within a few hours and always within 24 hours of your form arriving, including weekends.
No. It is one payment of 77 USD for a lifetime licence on one NinjaTrader account, with future updates included.
Once the licence has been issued the sale is final, because a licence on your account cannot be handed back. That is why the user guide is public: read it first. If you paid and the licence has not been issued yet, email me and I will refund you in full.
Yes. Email me from the address you bought with and I will move the licence to your new account login.
No indicator can promise that, and this one does not. It gives you an EMA crossover with a stop and targets drawn at the signal, and two panels to read it against. What you do with that, and how you size positions, decides the outcome.
Each one is a compiled NinjaScript Add-On, 77 USD once, with its own page, charts and public user guide.
Order blocks, fair value gaps, equal highs and lows, liquidity sweeps and previous-period levels, with BUY and SELL plates on closed bars, an entry, a stop, two targets, a dashboard and a scanner.
$77 one payment, lifetime licence
EMA-cross signals scored on six layers and rated in stars, with an entry line, a stop and three targets for the latest signal, an EMA ribbon, a session VWAP, a dashboard and alerts.
$77 one payment, lifetime licence
Three lines from a rolling window of highs and lows, signals on closed bars, one tracked trade with a stop, up to four targets and a break-even ladder, and a dashboard.
$77 one payment, lifetime licence
77 USD once. A lifetime licence on your NinjaTrader account, updates included, and the licence issued within 24 hours.


